Using Tiled with Kaplay
Personal notes from JLegendDev’s blog post
Prerequisites:
- Basic knowledge of Kaplay.js and JavaScript
- Tiled downloaded and installed
Assets:
- A 3 tiles wide x 3 tiles tall map. Download assets here.
- Bonus: The assets were used in the Zelda-like tutorial
Setting up Tiled

Once Tiled is installed, open the program and create a new map like shown in the screenshot above.

Next, set the map size to 3 x 3 and the tile size to 16 x 16 (Since our spritesheet is designed to be tiles of 16 x 16 pixels). Make sure the “Fixed” option is the one selected. Then, click “OK”.
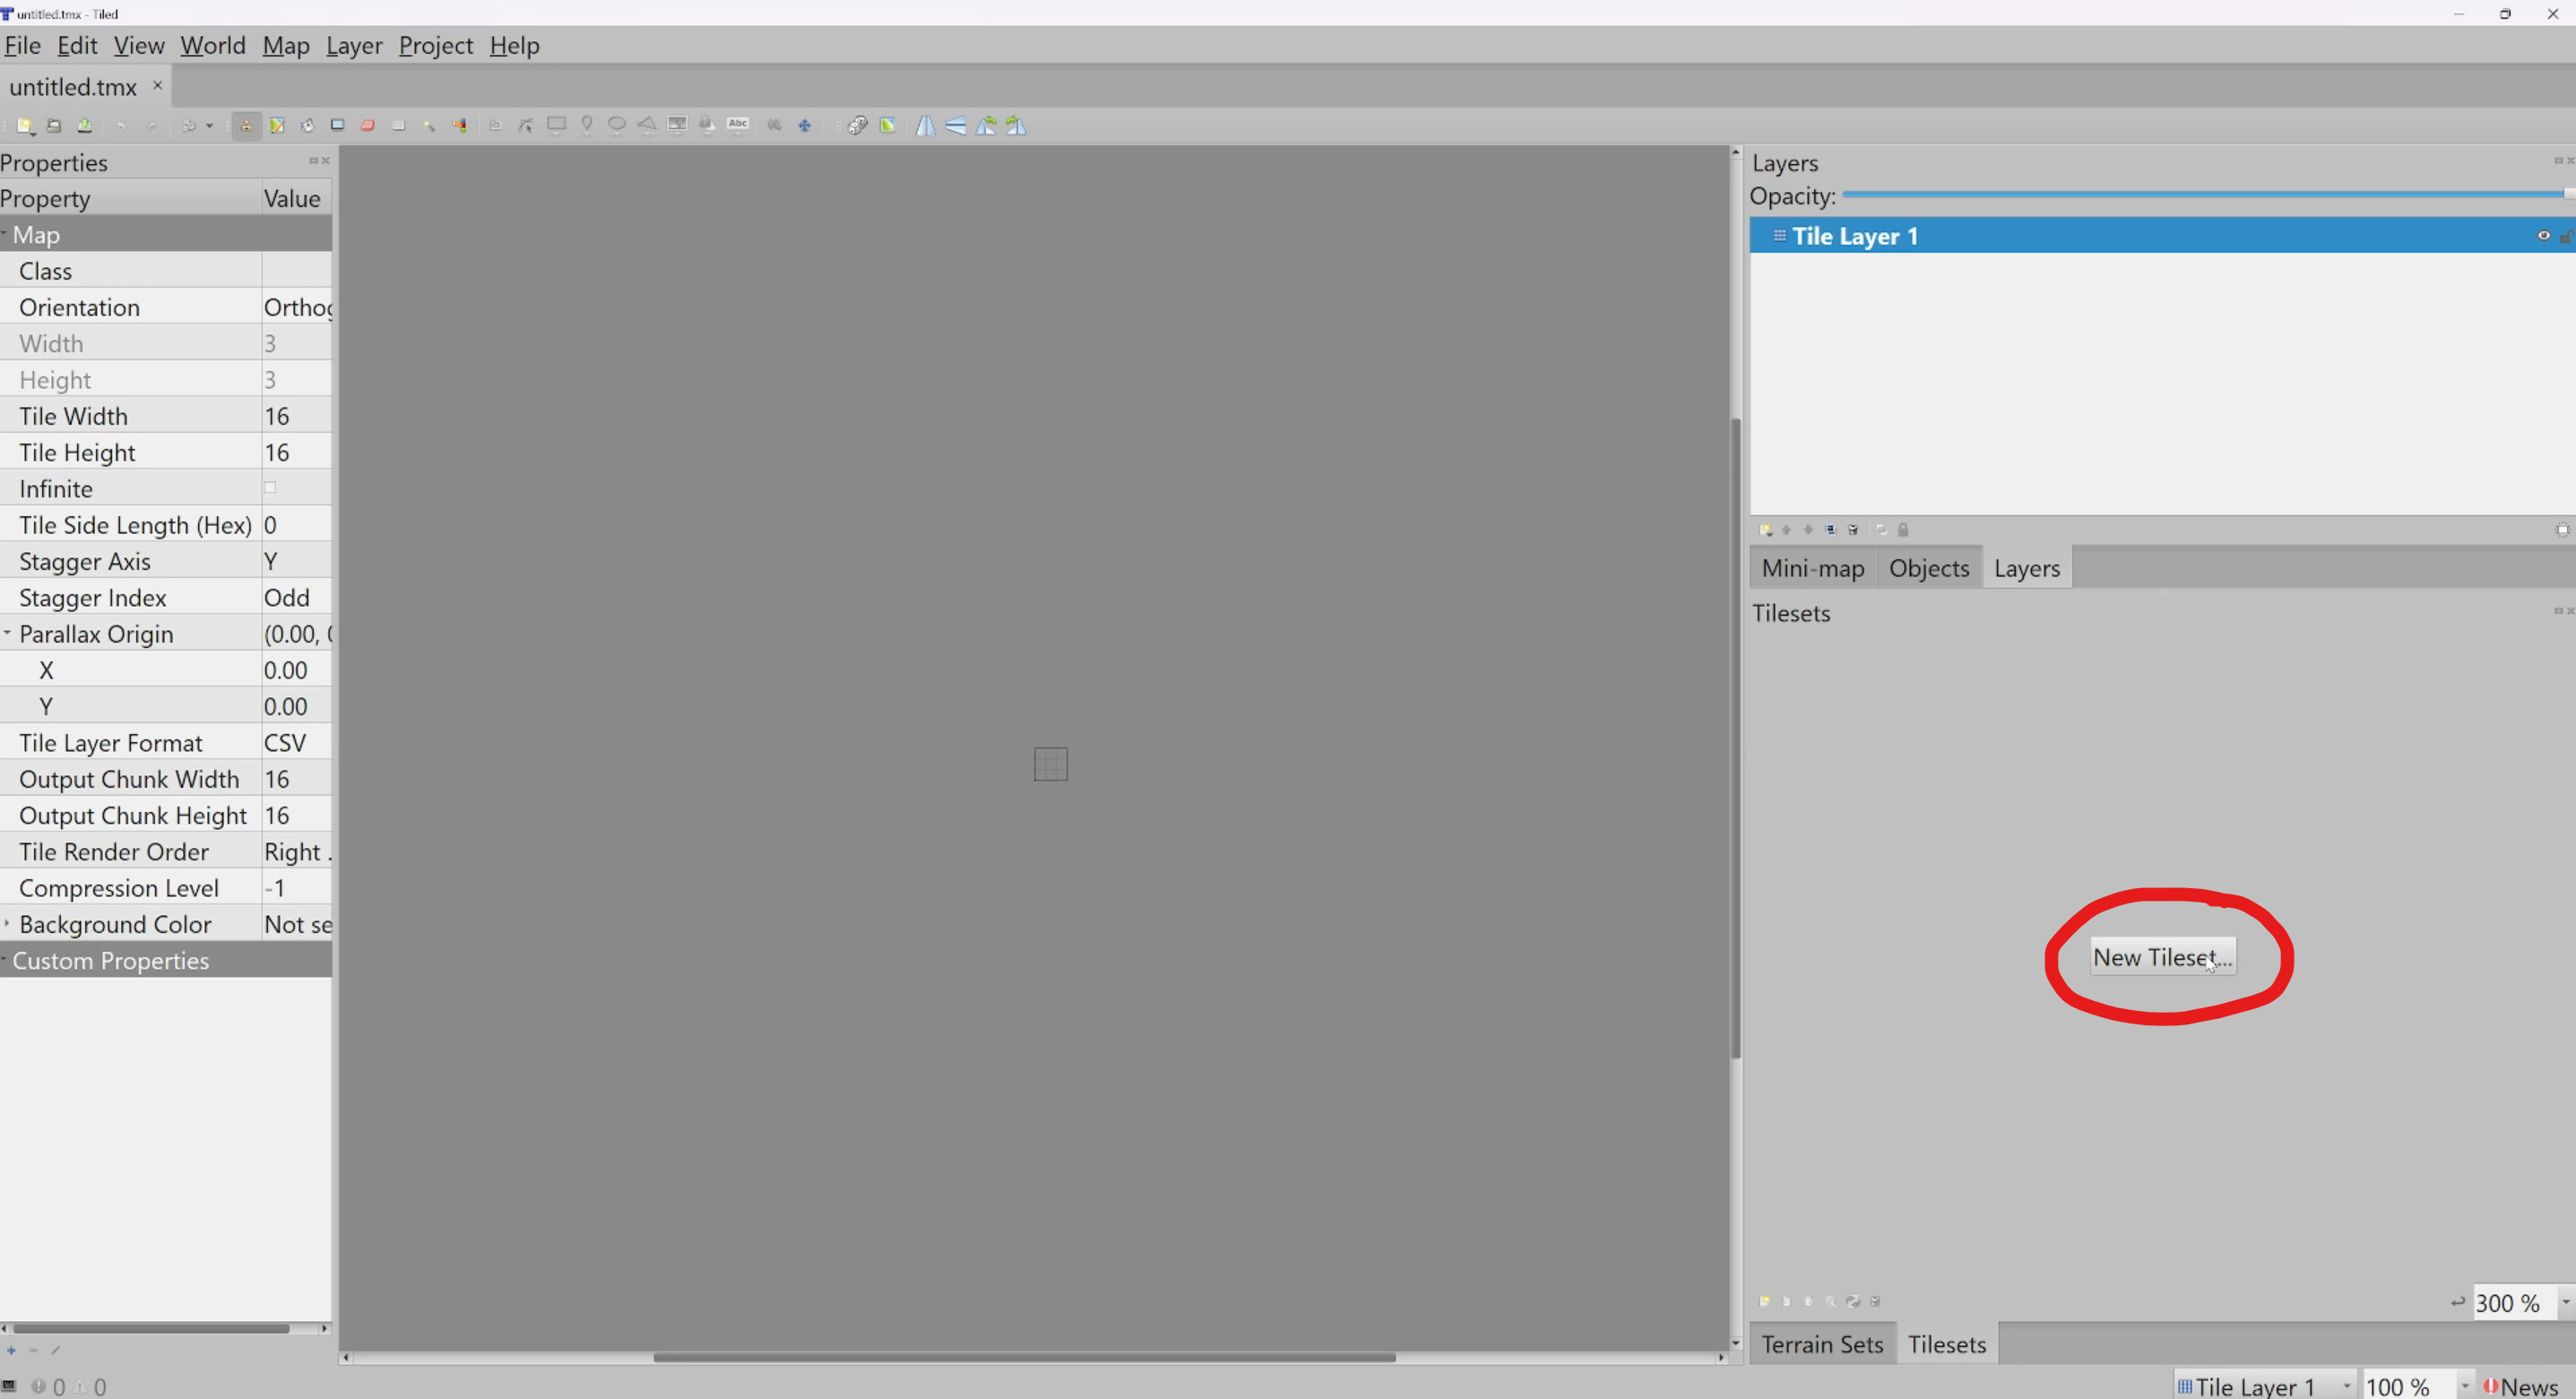
Now we still need to add our spritesheet so we can start drawing our level. Click on “New Tileset” as shown in the screenshot above.
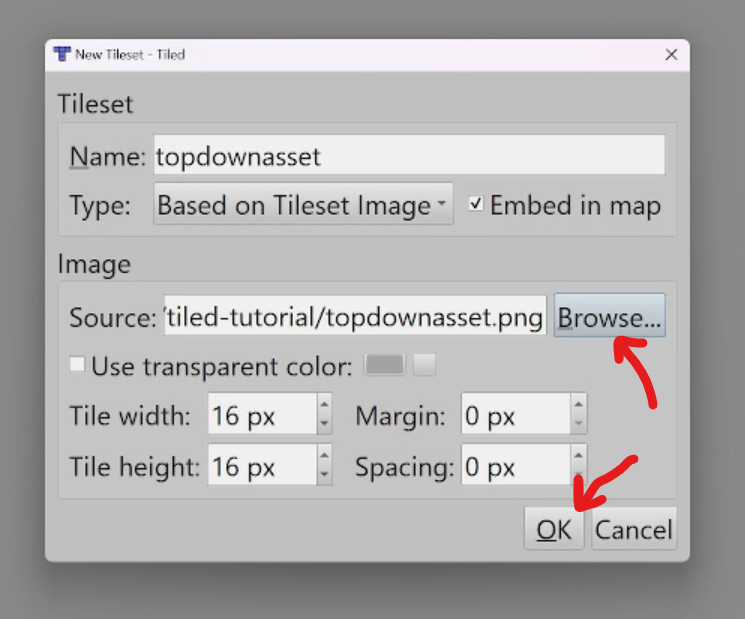
Click on the “Browse” button and select the spritesheet image you want to use in your file explorer. Then, click “OK”.
Creating Tile Layers

Rename the default layer named “Tile Layer 1” to “Ground” at the top-right of the editor by double clicking on the current layer name. This will make it editable allowing you to write a new name. Then at the bottom-right where you can see the spritesheet, select the grass tile and start drawing on your grid like shown in the screenshot above. Tip : You can use Ctrl + mouse wheel to zoom in and out.
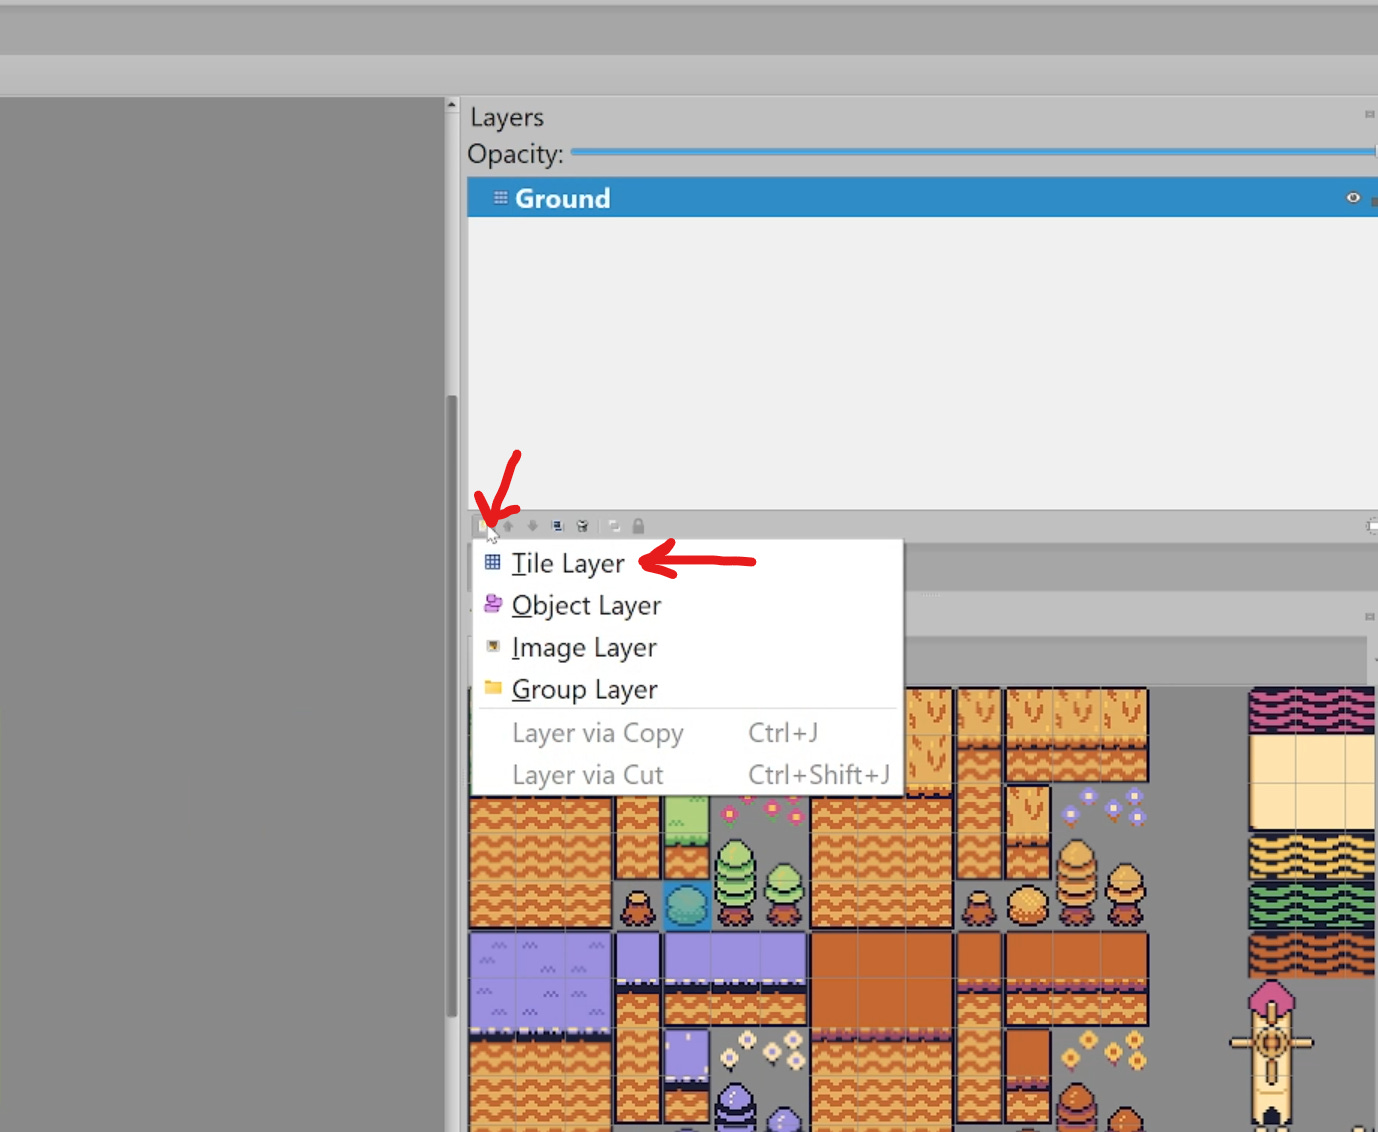
In Tiled, there two major types of layers you can create. The first one is the “Tile Layer” which is used for drawing tiles. The other one is the “Object Layer” and is used to set colliders (hitboxes) or spawn positions for your game entities.
By default, Tiled creates a “Tile Layer” as the first layer, that’s why you were able to draw on the grid previously. Now that you have drawn the ground which is composed of only grass tiles, it’s time to add a bush.
To do this, create a new “Tile Layer” like shown in the screenshot above and name it “Bushes”.
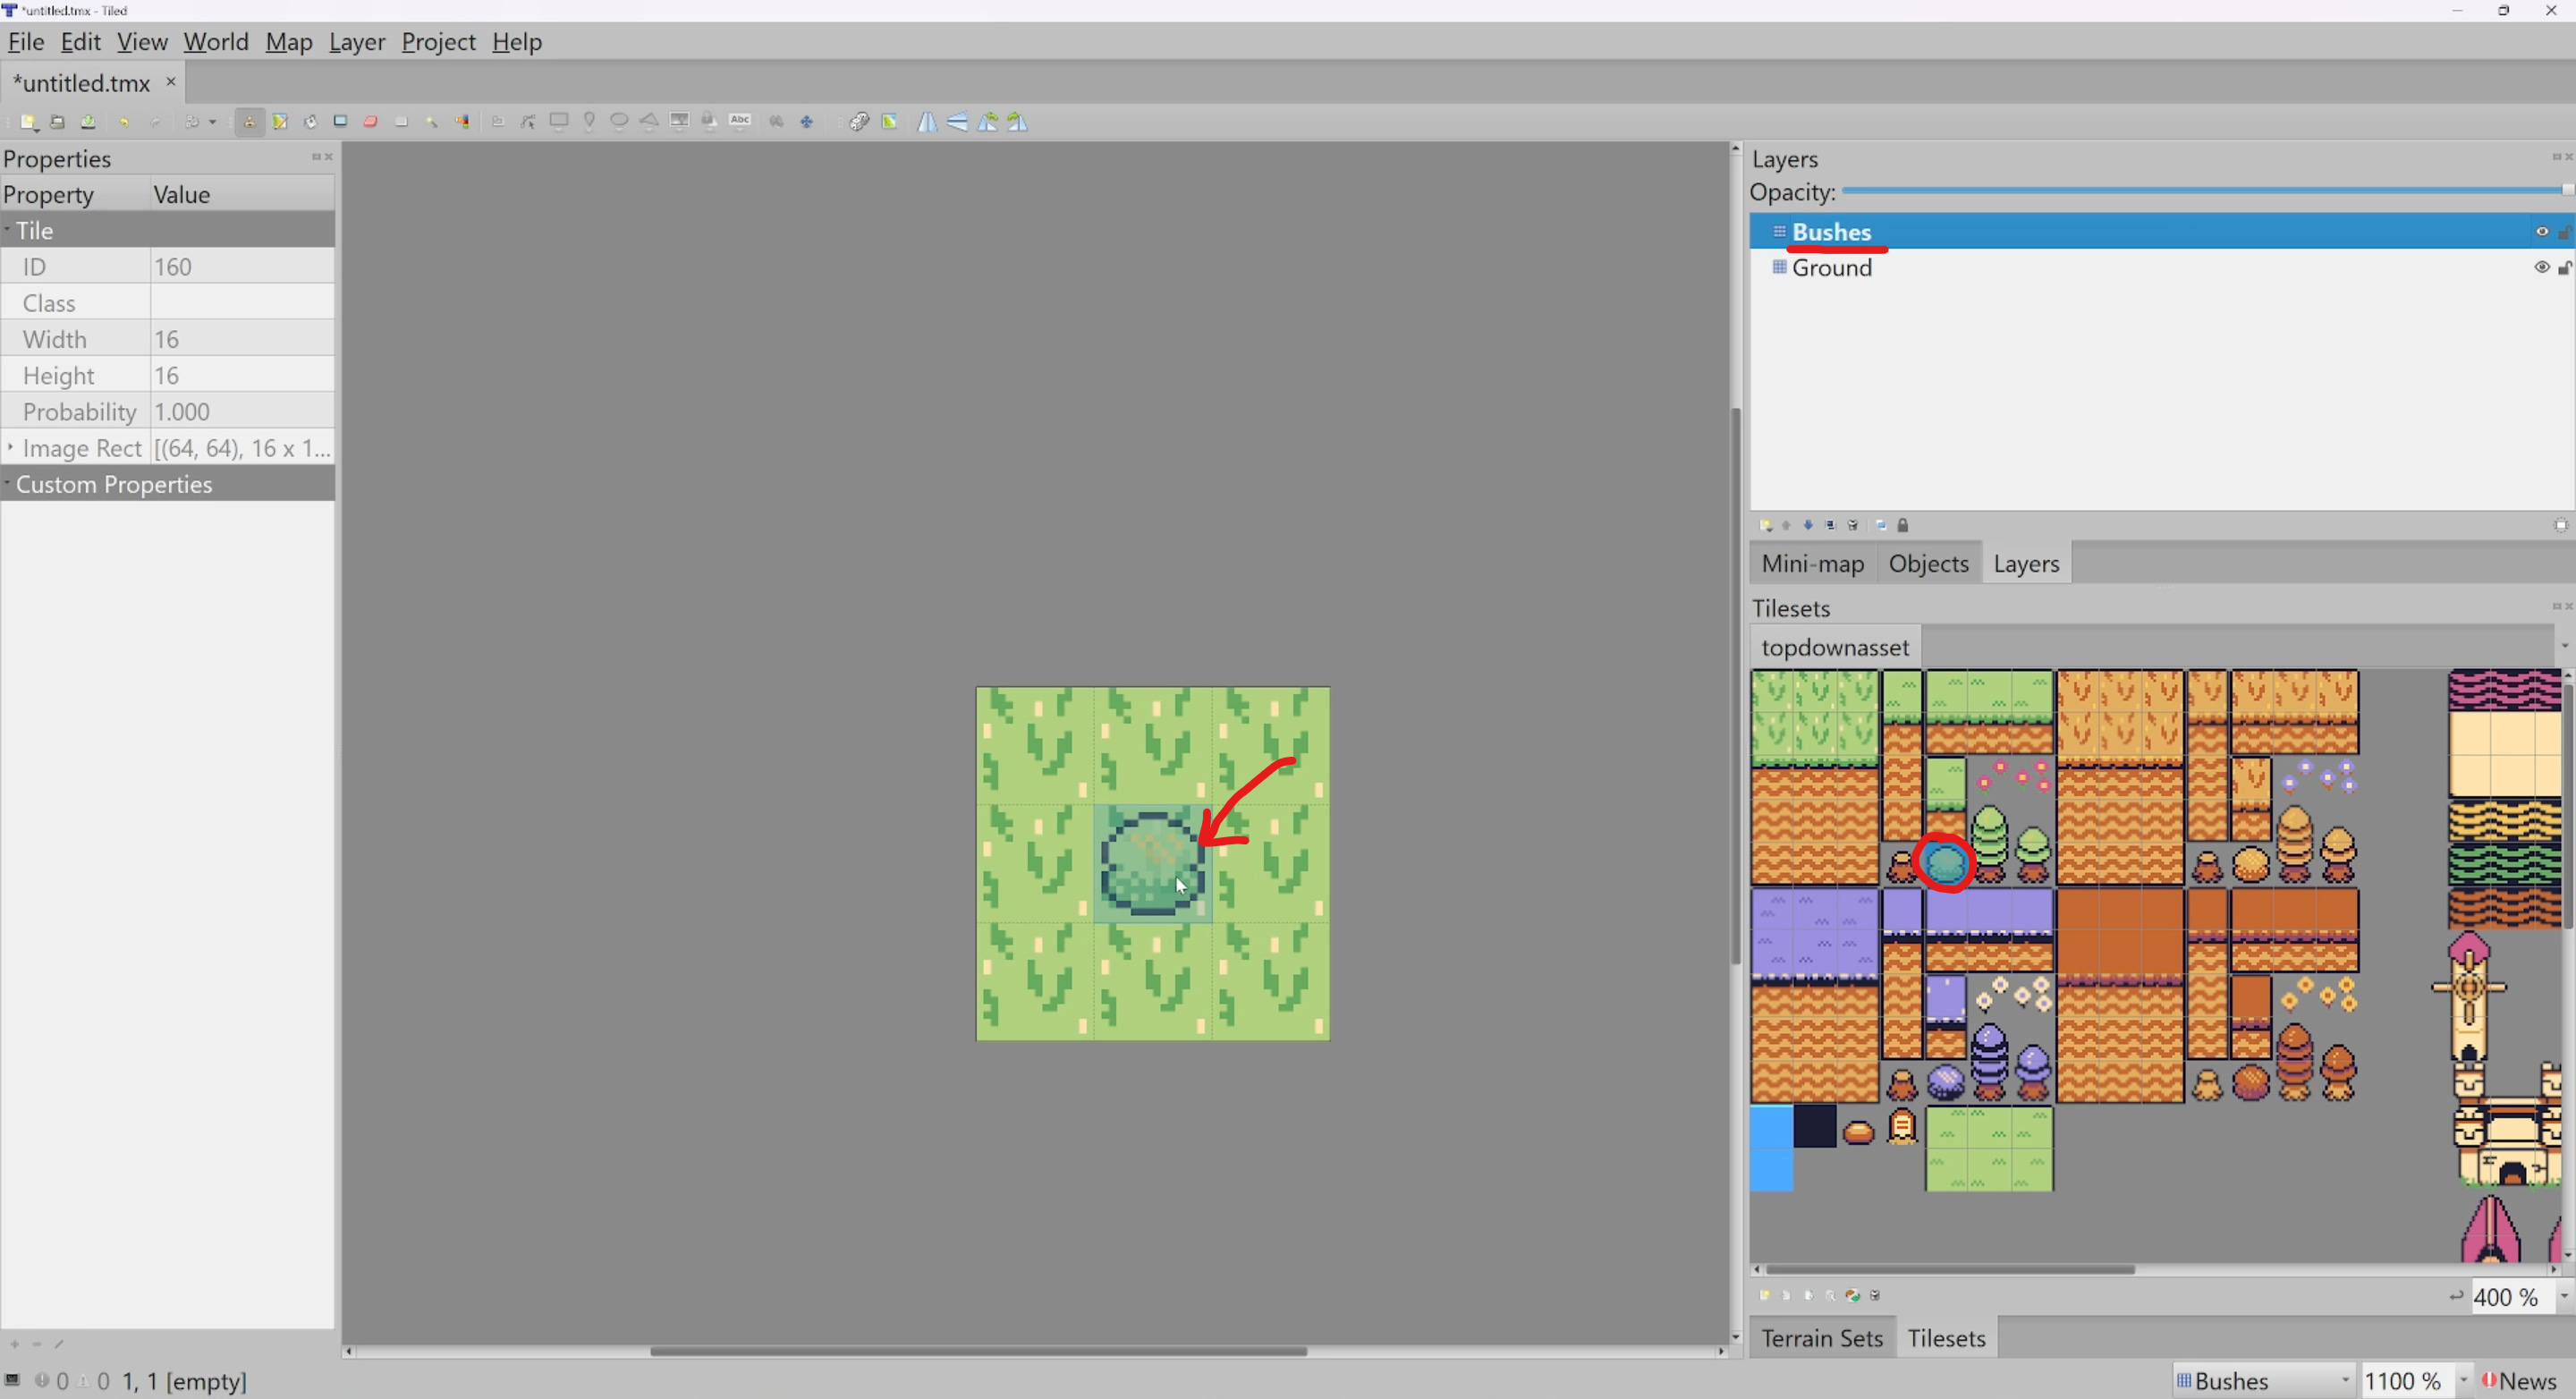
Make sure this new layer is placed on top of the “Ground” layer. If not the case by default, you can drag a layer around by holding the left mouse button over the tile layer name.
Finally, draw a bush at the center of the grid like shown in the screenshot. Make sure before you do this to have the “Bushes” layer selected in the Layers inspector (located at the top-right). You can select a layer by clicking on its name.
Creating Object Layers

Now that we’re done with placing our tiles we need to place our colliders. Colliders are static objects that can serve as obstacles or walls in games. The appropriate layer type for this would be an “Object Layer” because we only care about the position, the height and width of the collider which isn’t possible to set in a “Tile Layer”.
As shown in the screenshot above, create an “Object Layer”.
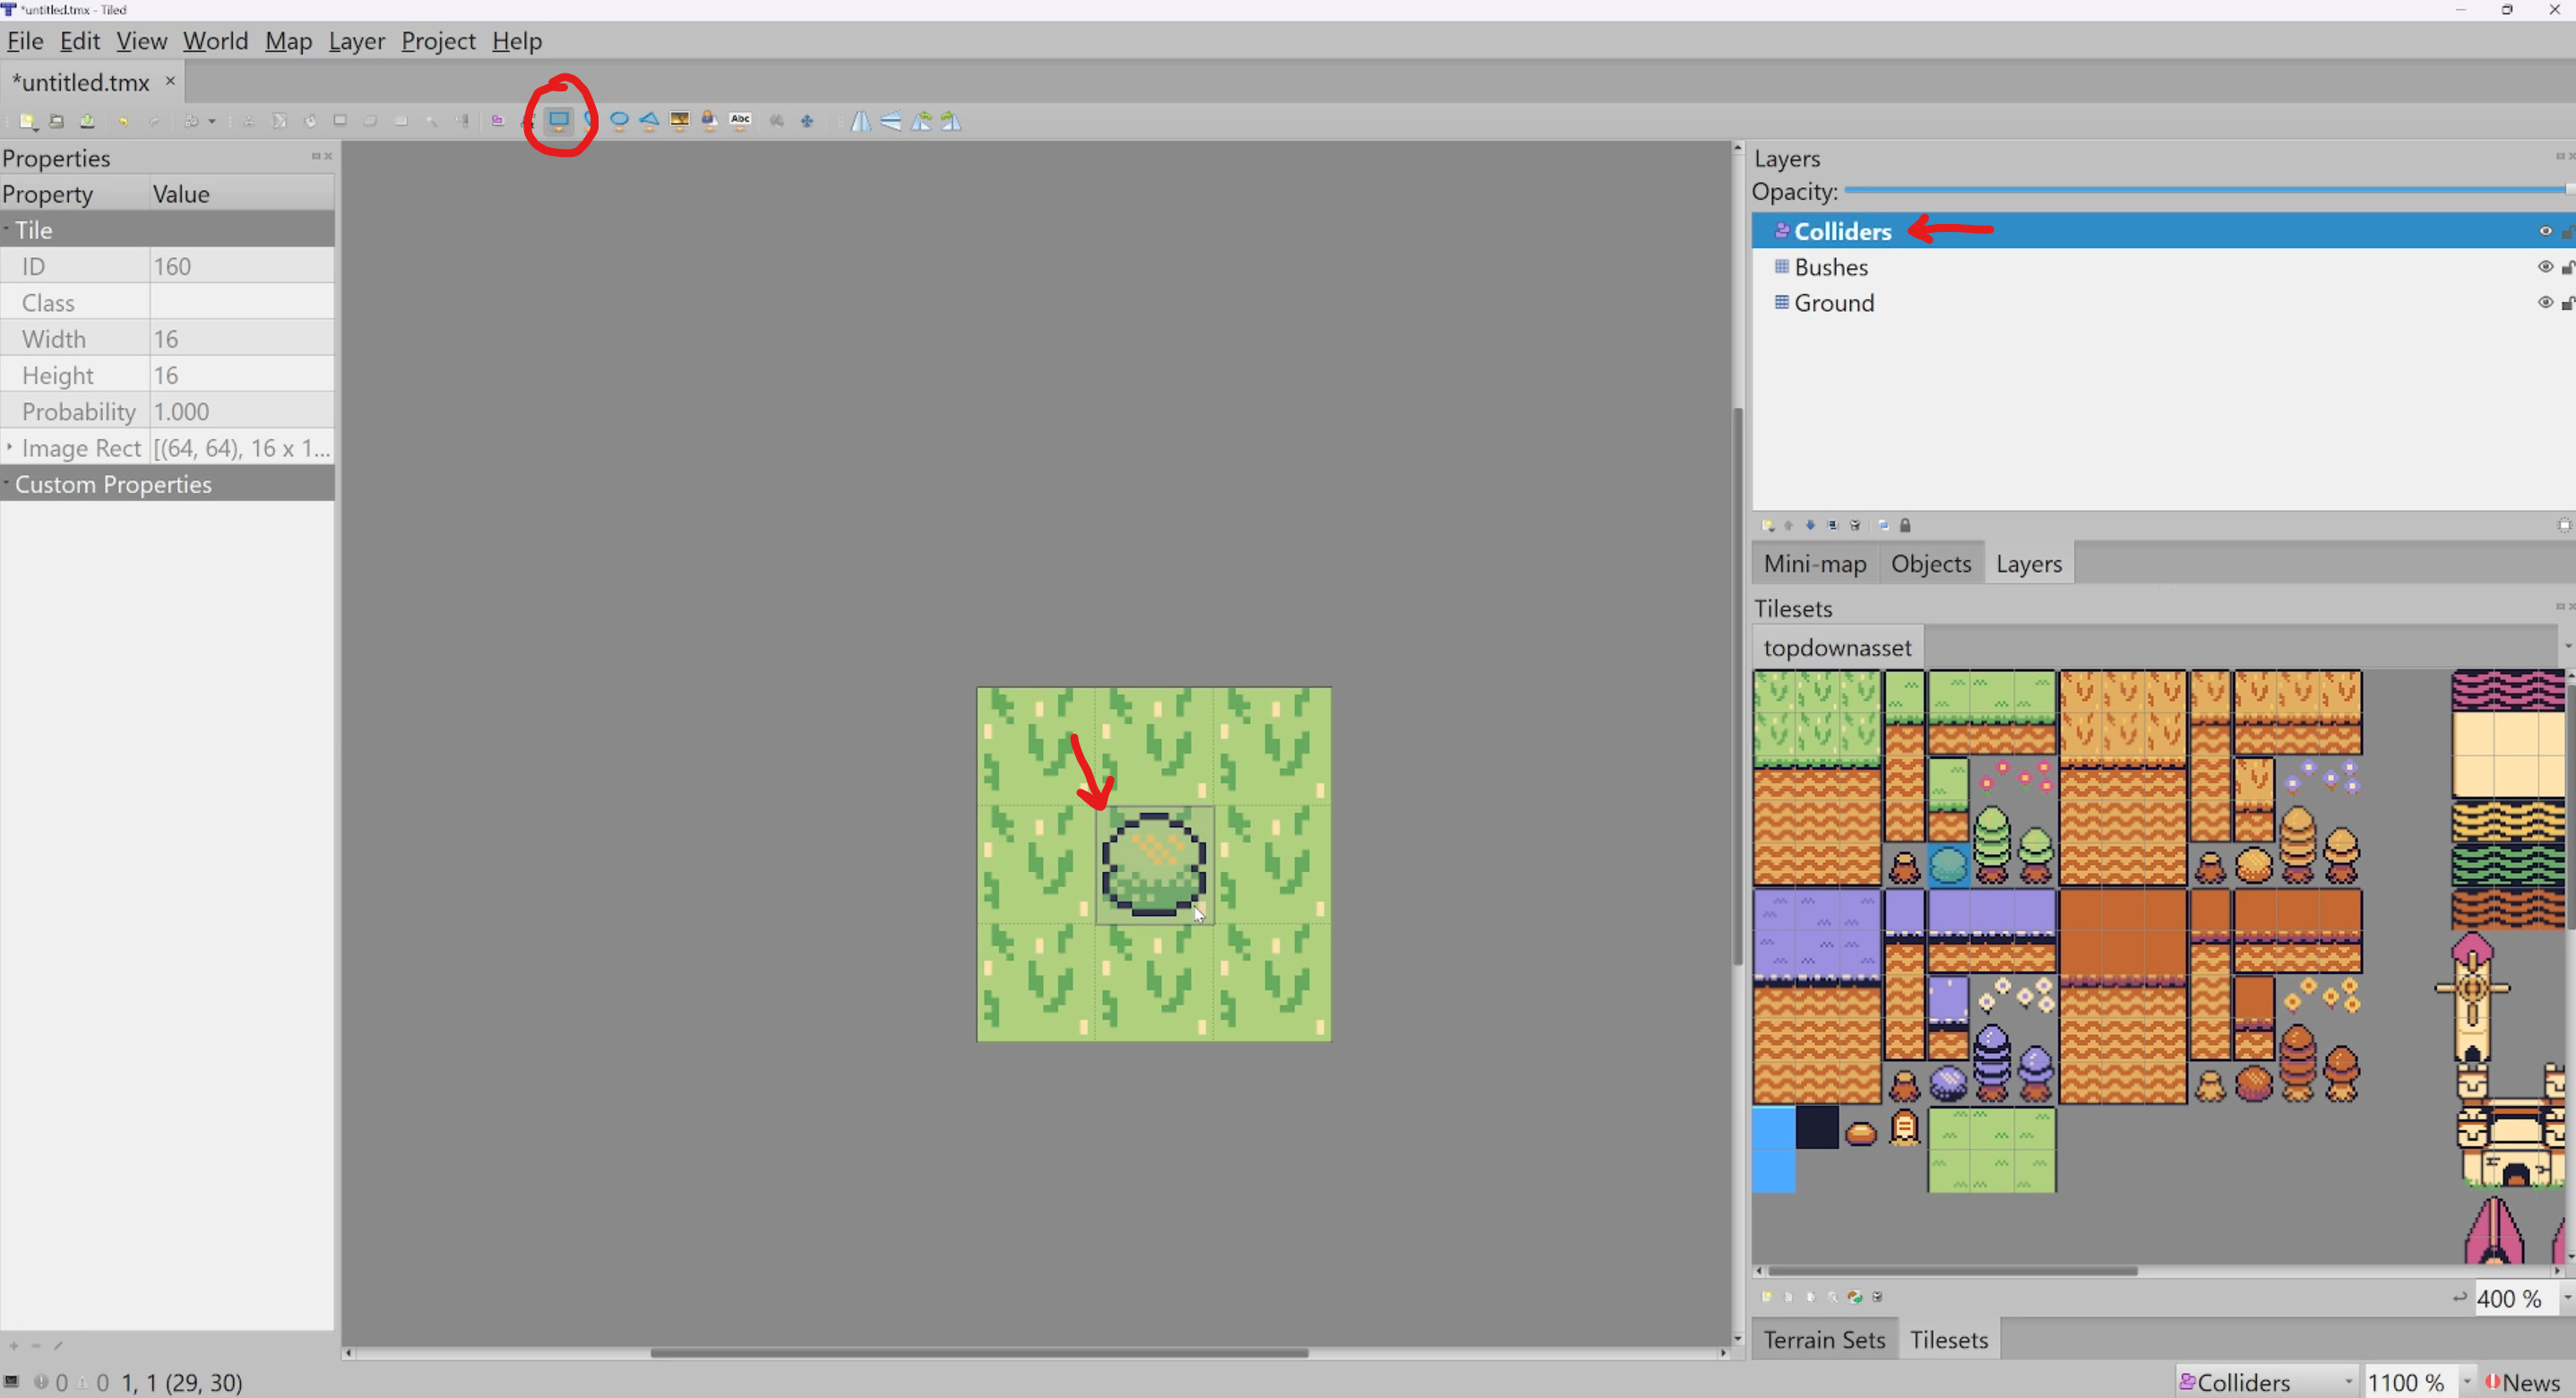
Rename it to “Colliders”. Names are important because they’re used to determine what to do with each layer in our code.
Select the rectangle icon at the top-left of the editor (shown in the screenshot above). Draw a square on the grid by clicking and dragging it around to set its size.
If we had 3 bushes aligned, we would draw one long rectangle as the collider instead of 3 squares as it would be better for performance. In Kaplay.js, the more Game Objects are created the less the game remains performant so it’s important to limit the amount of colliders needed (as much as possible).
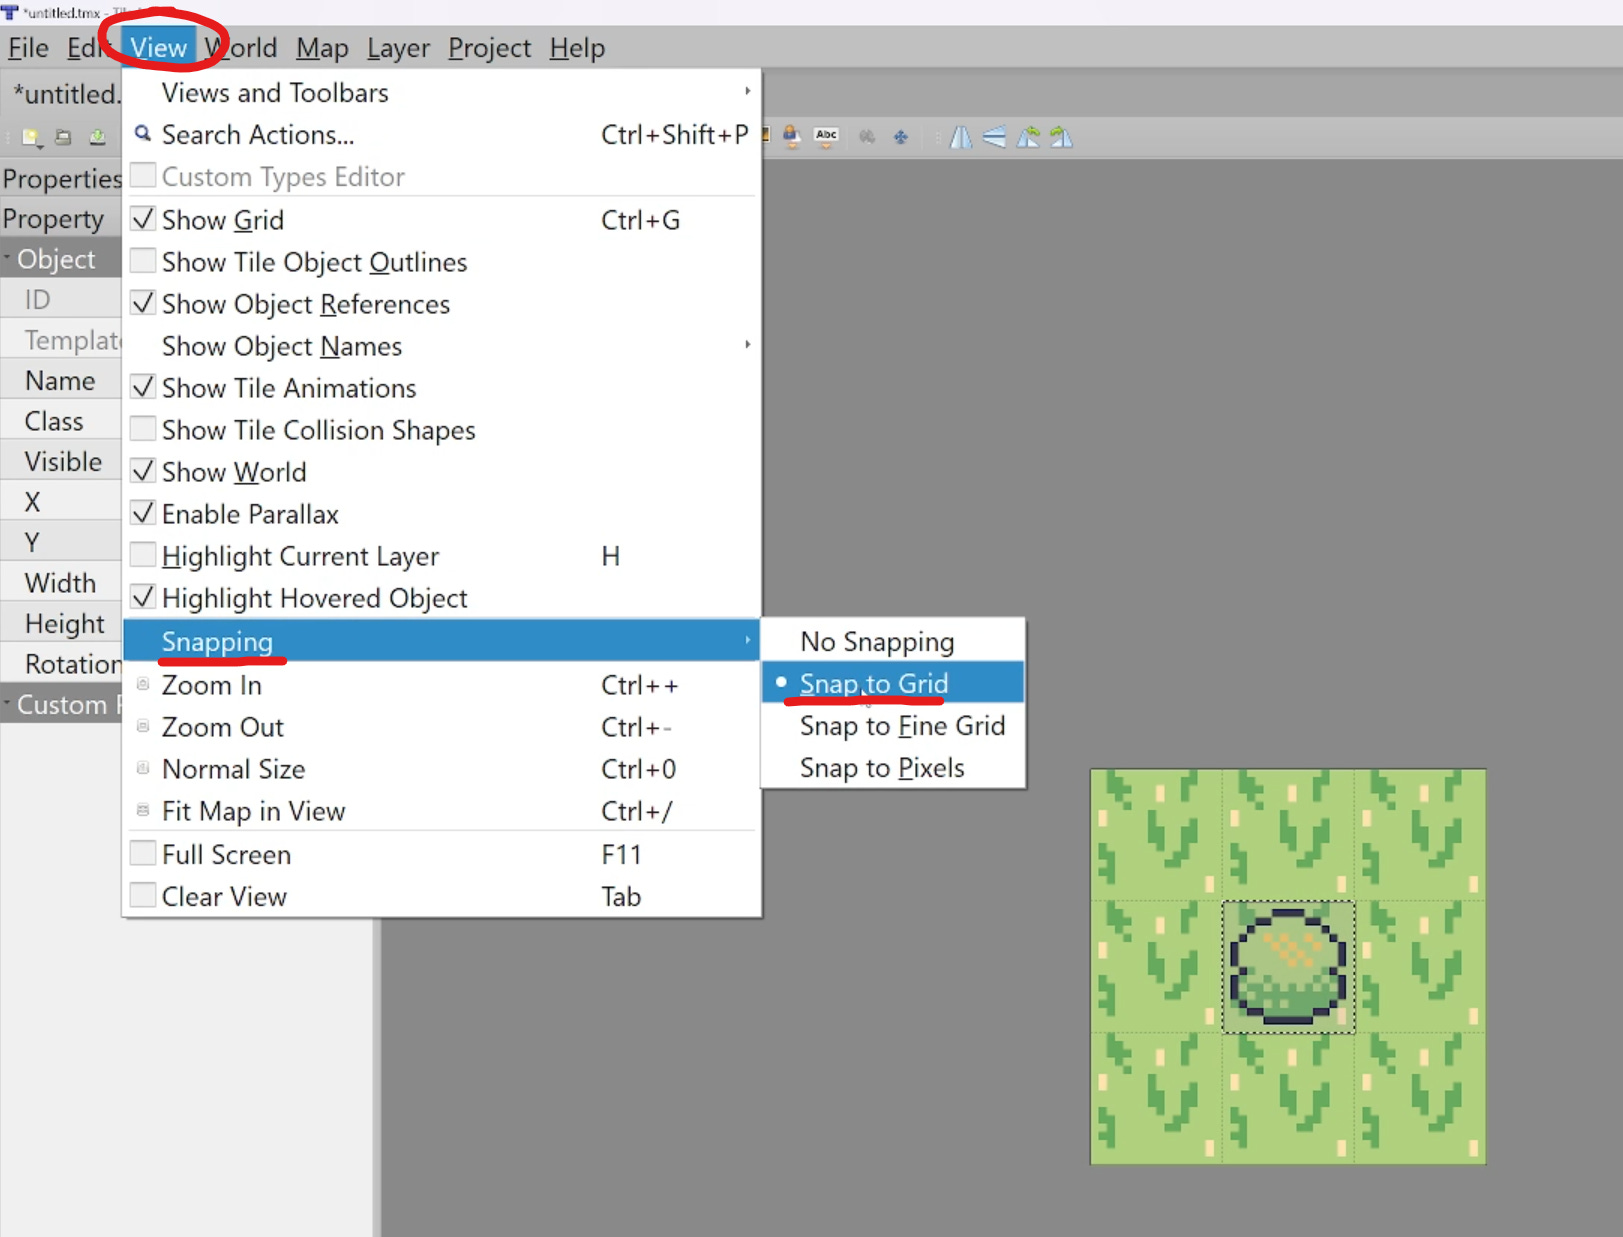
To make things easy, make sure to enable the “Snap to Grid” option before drawing the rectangle on the grid. This option will make sure the square fits the tile perfectly. It makes things less error prone. You can access this option by going to “View” > “Snapping” > “Snap to Grid”. This is shown in the screenshot above.
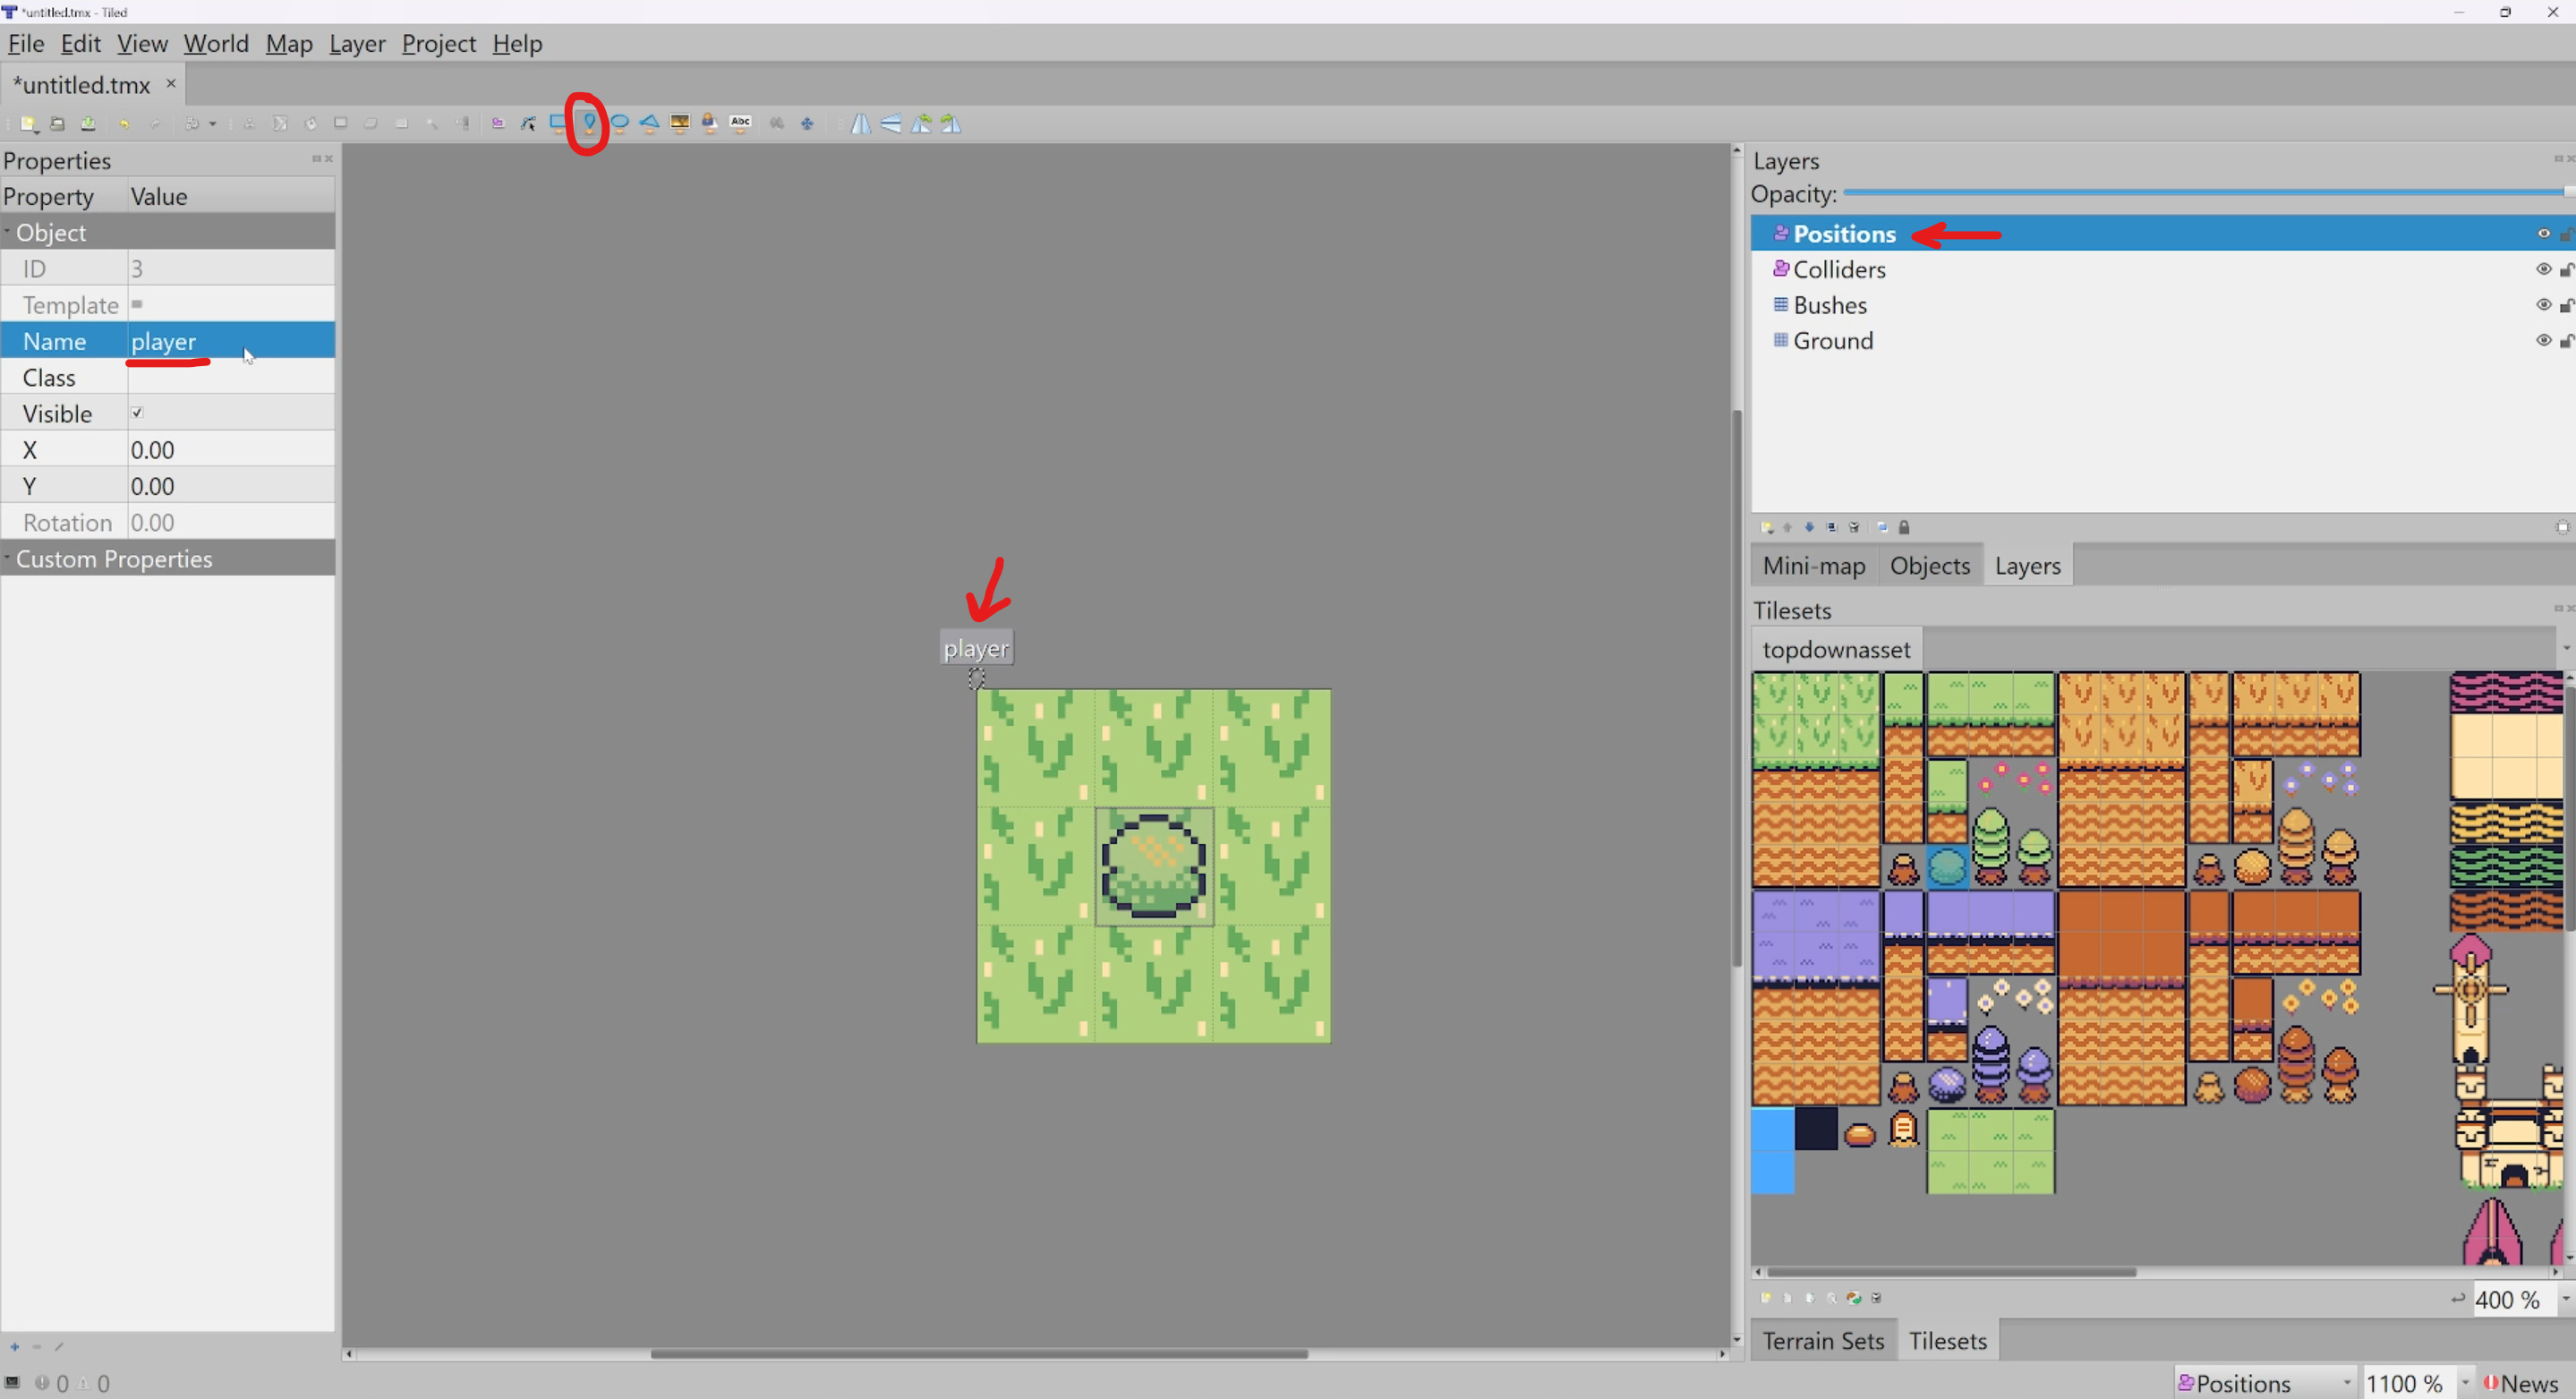
Now, create another “Object Layer” and name it “Positions”. This layer will be used to determine where to place our player on the map. Instead of drawing a square like we did for the “Colliders” layer, select the pin icon (at the top-left of the editor) and place a pin at the top-left of the grid. This is where our player will spawn. Using the properties tab on the left, set the name of the pin to be “player”. This is useful to know in your code where to place what. For example, you could have pins named “spider”, “bear”, etc… and for each you would write code to display something different.
Make sure to save your map by going to “File” > “Save As…”. Name the map file as “map.json” and save it to your project’s directory.
In Kaplay, drawing tiles individually using k.drawSprite() calls is less efficient than using Tiled to convert our map into a single image and then displaying it within a sprite component. This might sound strange and it is. In other game libraries, it’s more efficient to draw tiles individually rather than baking them into an image. I don’t know how Kaplay implements this, I’m as puzzled as you.
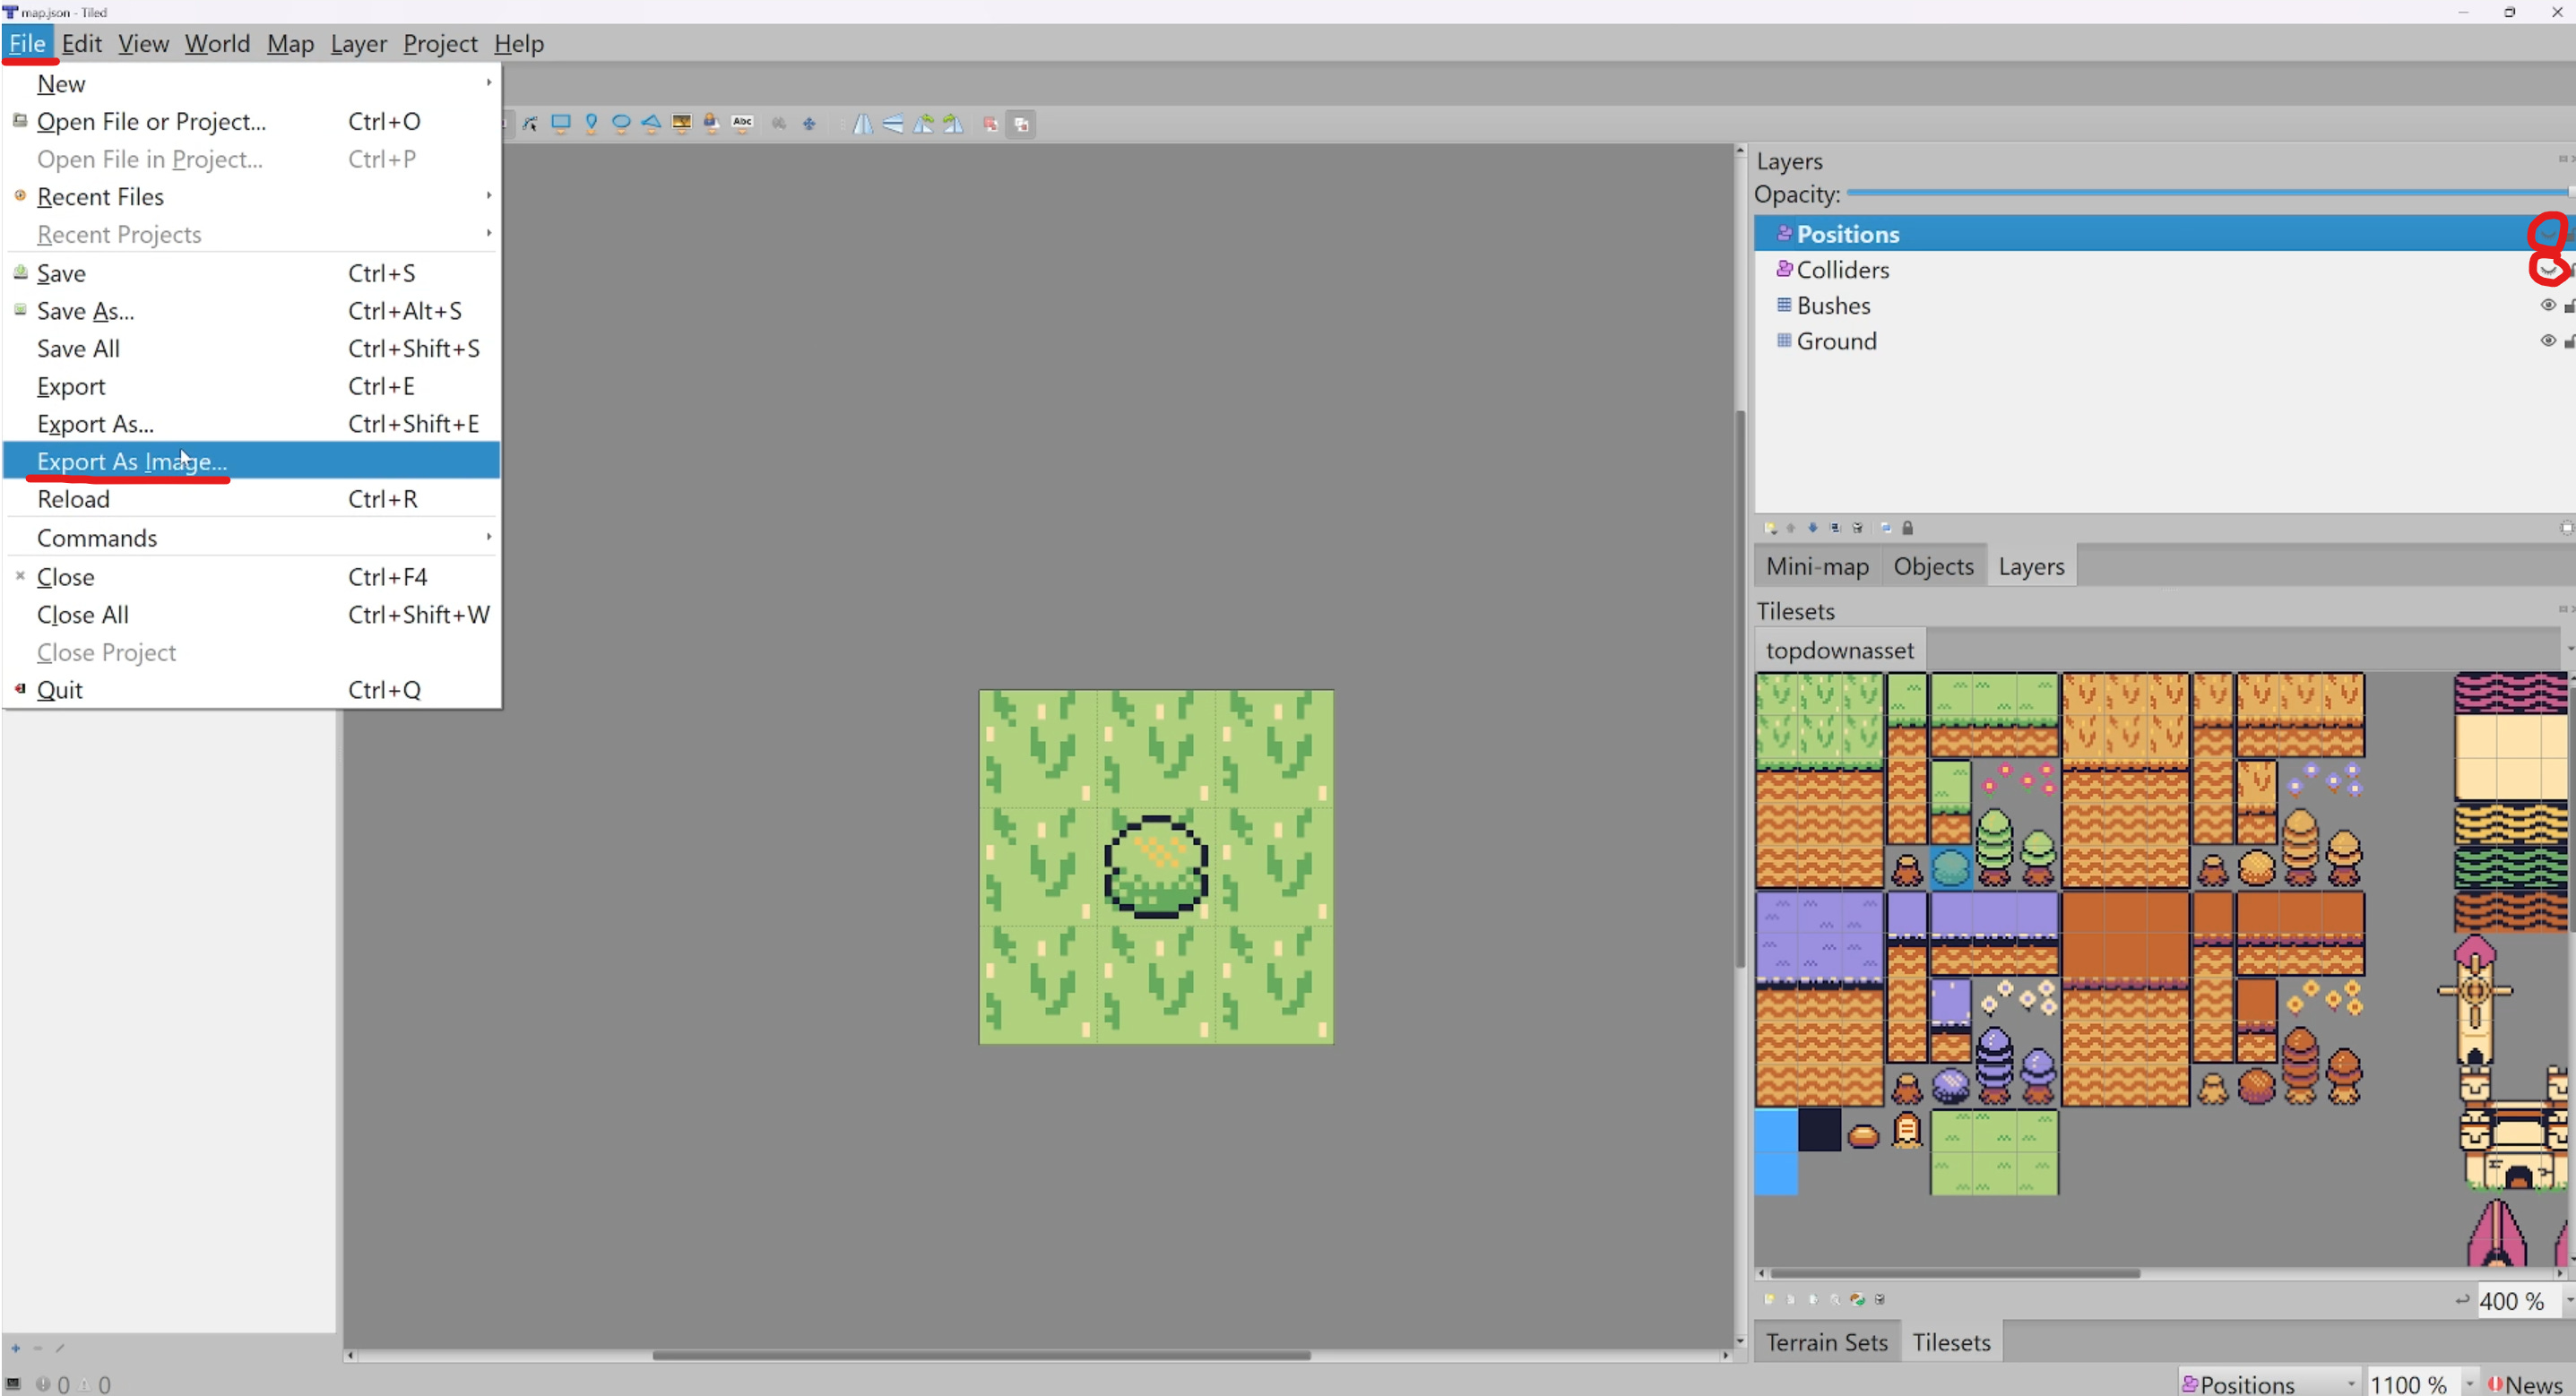
To convert our tilemap to a single image, first, In the Layers inspector, hide the “Positions” and “Colliders” layers by clicking on the eye icons as shown in the screenshot above.
Then, go to “File” and click on “Export As Image”.
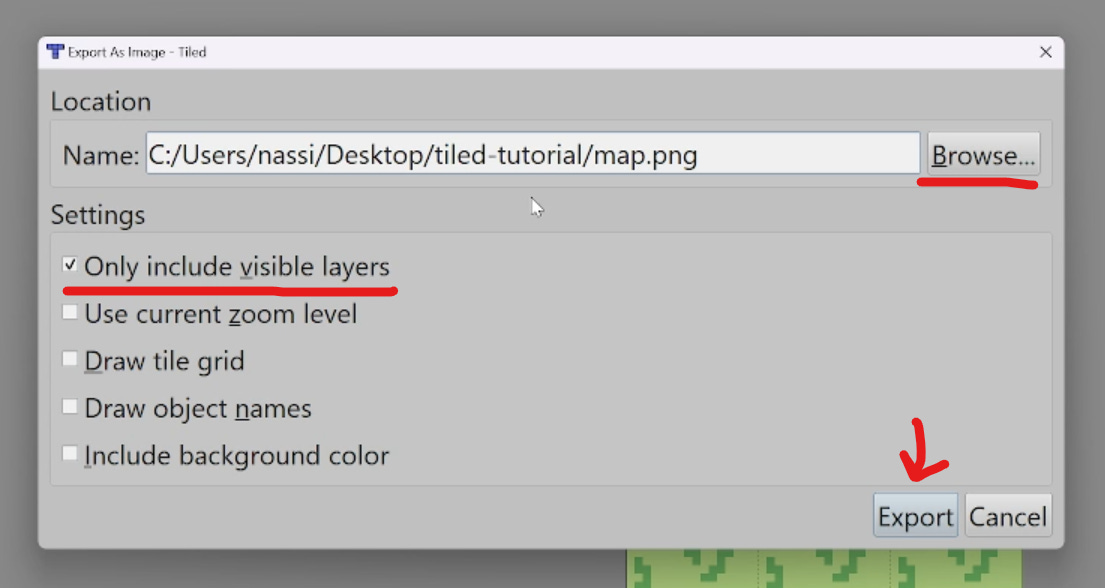
A new menu will appear. Set the place where you want to save the image using the “Browse” button. Once done, make sure to select the option “Only include visible layers” and then click “Export”.
Rendering The map in Kaplay
Your “map.json” contains all the data needed to to display your map in Kaplay. Not all of the data is useful, so the most important part is the “layers” property which contains an array of layers. In this project, we only created 3 layers so this array should only have three elements.
As your map grows in size so will this “map.json” file. That’s why I kept the map very small so I could paste the entire “map.json” file here.
1
2
3
4
5
6
7
8
9
10
11
12
13
14
15
16
17
18
19
20
21
22
23
24
25
26
27
28
29
30
31
32
33
34
35
36
37
38
39
40
41
42
43
44
45
46
47
48
49
50
51
52
53
54
55
56
57
58
59
60
61
62
63
64
65
66
67
68
69
70
71
72
73
74
75
76
77
78
79
80
81
82
83
84
85
86
87
88
89
90
91
92
93
94
95
96
97
98
99
100
101
102
103
104
105
106
107
108
109
110
111
112
113
114
115
116
 {
  "compressionlevel": -1,
  "height": 3,
  "infinite": false,
  "layers": [
    {
      "data": [41, 41, 41, 41, 41, 41, 41, 41, 41],
      "height": 3,
      "id": 1,
      "name": "Ground",
      "opacity": 1,
      "type": "tilelayer",
      "visible": true,
      "width": 3,
      "x": 0,
      "y": 0
    },
    {
      "data": [0, 0, 0, 0, 161, 0, 0, 0, 0],
      "height": 3,
      "id": 2,
      "name": "Bushes",
      "opacity": 1,
      "type": "tilelayer",
      "visible": true,
      "width": 3,
      "x": 0,
      "y": 0
    },
    {
      "draworder": "topdown",
      "id": 3,
      "name": "Colliders",
      "objects": [
        {
          "height": 16,
          "id": 1,
          "name": "",
          "rotation": 0,
          "type": "",
          "visible": true,
          "width": 16,
          "x": 16,
          "y": 16
        }
      ],
      "opacity": 1,
      "type": "objectgroup",
      "visible": false,
      "x": 0,
      "y": 0
    },

    {
      "draworder": "topdown",
      "id": 4,
      "name": "Positions",
      "objects": [
        {
          "height": 0,
          "id": 3,
          "name": "player",
          "point": true,
          "rotation": 0,
          "type": "",
          "visible": true,
          "width": 0,
          "x": 0,
          "y": 0
        },
        {
          "height": 0,
          "id": 4,
          "name": "player",
          "point": true,
          "rotation": 0,
          "type": "",
          "visible": true,
          "width": 0,
          "x": 0,
          "y": 0
        }
      ],
      "opacity": 1,
      "type": "objectgroup",
      "visible": false,
      "x": 0,
      "y": 0
    }
  ],
  "nextlayerid": 5,
  "nextobjectid": 5,
  "orientation": "orthogonal",
  "renderorder": "right-down",
  "tiledversion": "1.10.2",
  "tileheight": 16,
  "tilesets": [
    {
      "columns": 39,
      "firstgid": 1,
      "image": "topdownasset.png",
      "imageheight": 496,
      "imagewidth": 624,
      "margin": 0,
      "name": "topdownasset",
      "spacing": 0,
      "tilecount": 1209,
      "tileheight": 16,
      "tilewidth": 16
    }
  ],
  "tilewidth": 16,
  "type": "map",
  "version": "1.10",
  "width": 3
}
Assuming you know how to setup Kaplay, here is the code you need to be able to display the map.
1
2
3
4
5
6
7
8
9
10
11
12
13
14
15
16
17
18
19
20
21
22
23
24
25
26
27
28
29
30
31
32
33
34
35
36
37
38
39
40
41
42
43
44
45
46
47
 import kaplay from "./lib/kaplay.mjs";

const k = kaplay({ global: false });

k.loadSprite("spritesheet", "./topdownasset.png", {
  sliceX: 39,
  sliceY: 31,
}); // this is needed for the player animations
// This because the tiles + player sprites are in the same image
// If they were separate, we wouldn't need to load the tilesheet as the exported "map.png" would be enough

k.loadSprite("map", "./map.png");

async function main() {
  const mapData = await (await fetch("./map.json")).json();
  const map = k.add([k.pos(100, 100)]);
  k.camPos(map.pos);
  k.camScale(8);

  map.add([k.sprite("map")]);

  for (const layer of mapData.layers) {
    if (layer.type === "tilelayer") continue;

    if (layer.name === "Colliders") {
      for (const object of layer.objects) {
        map.add([k.area({ shape: new k.Rect(k.vec2(0), object.width, object.height) }), k.body({ isStatic: true }), k.pos(object.x, object.y)]);
      }
      continue;
    }

    if (layer.name === "Positions") {
      for (const object of layer.objects) {
        if (object.name === "player") {
          map.add([
            k.sprite("spritesheet", { frame: 936 }), // idle frame of the player sprite
            k.area(),
            k.pos(object.x, object.y),
          ]);
          continue;
        }
      }
    }
  }
}

main();
Given the code above and the content of “map.json”, you can figure out what’s going on easily.
However, here a few observations that will help you understand the logic further :
-
You get the map’s data into your Kaplay game by making a fetch() call to the “map.json” file.
-
We create a map Game Object acting as the parent of all Game Objects placed on the map. This is important because the position coordinates provided by “map.json” are all relative to the map. So if you create a Game Object without the map being the parent, the Game Object’s placement will be off. With our map Game Object we’re able to make sure the positions of tiles and colliders match.
-
Since we’re not drawing the map tile by tile and rather just using the exported image, it’s important to skip any “Tile Layer” in our for loop.
The Results

Now if I activate the debug mode using the “f1” key, you can see that the collider for the bush is also placed correctly. If you were to write the player movement logic, the player could collide with the bush.

Enjoy Reading This Article?
Here are some more articles you might like to read next: